Network Configuration Snippets Management - rConfig V8
Configuration Snippets: Implementation Guide
Section titled “Configuration Snippets: Implementation Guide”This guide covers everything needed to create, test, and deploy configuration snippets in rConfig V8 Pro, from basic static snippets to advanced parameterized configurations with special instructions.
Prerequisites
Section titled “Prerequisites”- rConfig V8 Pro installation
- Devices configured and backing up successfully
- Appropriate permissions (admin role or snippet creation/deployment permissions)
- Understanding of device command syntax for your network equipment
Creating Snippets
Section titled “Creating Snippets”Accessing Snippet Management
Section titled “Accessing Snippet Management”Navigate to Config Tools → Snippets
Adding a New Snippet
Section titled “Adding a New Snippet”Click Add Snippet to open the snippet creation form. Play the video below for a walkthrough of adding and editing snippets.
Snippet Configuration Fields
Section titled “Snippet Configuration Fields”Name (required)
- Descriptive name for the snippet
- Good: “Add Standard SNMP Configuration”
- Bad: “Snippet1”
Description (optional but recommended)
- Explain what the snippet does
- Note any prerequisites or warnings
- Example: “Configures standard SNMP community, location, and contact. Requires write access.”
Snippet Content (required)
- Free-text field for configuration commands
- Write commands exactly as you would type them in a device console session
- Include mode changes (
conf tfor Cisco config mode) - Include save commands (
wr mem,copy run start)
RBAC (Role-Based Access Control)
- Assign which roles can view and deploy this snippet
- Admin role has access to all snippets (hardcoded)
- Use RBAC to restrict sensitive snippets to authorized users
Writing Effective Snippets
Section titled “Writing Effective Snippets”Basic Snippet Structure
Section titled “Basic Snippet Structure”Cisco IOS example:
conf tvlan 100 name Engineeringexitwr memexitStructure breakdown:
conf t- Enter configuration mode- Configuration commands (VLAN creation and naming)
exit- Exit VLAN config sub-modewr mem- Save configurationexit- Exit config mode
Include All Necessary Commands
Section titled “Include All Necessary Commands”Common mistakes:
- Forgetting to enter config mode
- Forgetting to save configuration
- Not exiting config mode cleanly
Complete snippet (removes and adds NTP server):
conf tno ntp server 192.168.1.10ntp server 10.0.0.5exitwr memexitVendor-Specific Syntax
Section titled “Vendor-Specific Syntax”Different vendors require different command syntax. Create separate snippets per vendor or use parameterized snippets with vendor selection.
Cisco:
conf tsnmp-server community rConfig123 ROexitwr memJuniper:
configureset snmp community rConfig123 authorization read-onlycommitexitAruba:
configure terminalsnmp-server community rConfig123exitwrite memoryMulti-Step Procedures
Section titled “Multi-Step Procedures”For complex changes, break into logical steps:
conf t! Remove old ACLno ip access-list extended OLD_ACL
! Create new ACLip access-list extended NEW_ACL permit ip 10.0.0.0 0.255.255.255 any deny ip any any log
! Apply to interfaceinterface GigabitEthernet0/1 ip access-group NEW_ACL in
exitwr memexit
Parameterized Snippets
Section titled “Parameterized Snippets”Parameterized snippets use variables that are filled in at deployment time, making snippets reusable across different scenarios.
Variable Syntax
Section titled “Variable Syntax”Variables use curly brace notation: {variable_name}
Example:
interface {interface_name} description {description_text} no shutdownexitwr memVariable Reuse
Section titled “Variable Reuse”You can use the same variable multiple times in a snippet:
interface {interface_name} description Default configuration for {interface_name} ip address {ip_address} 255.255.255.0 no shutdownexitwr memWhen deploying, you’ll be prompted once for {interface_name} and once for {ip_address}. The {interface_name} value is used in both the interface selection and the description.
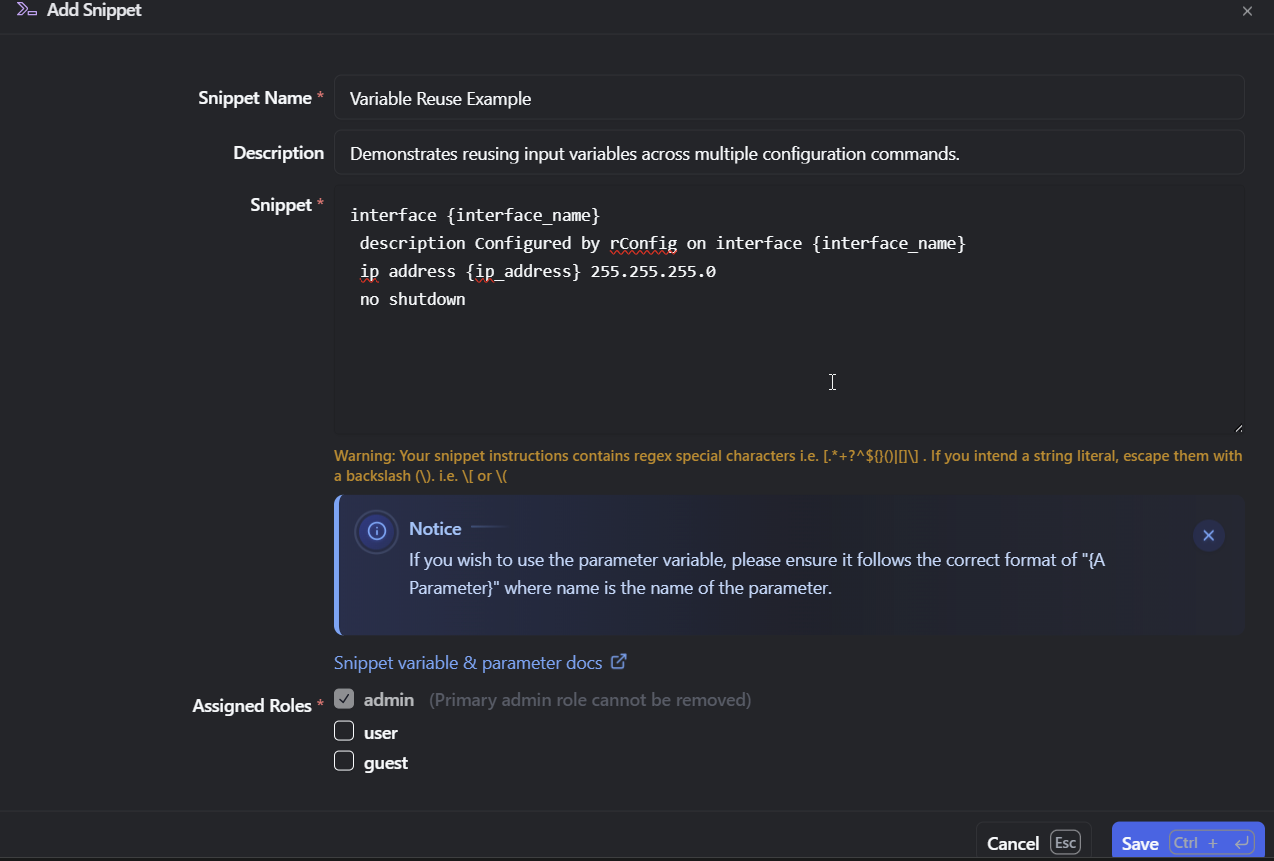
Parameterized snippet showing variable placeholders
Parameter Prompt Behavior
Section titled “Parameter Prompt Behavior”At deployment time:
- rConfig detects variables in snippet
- User prompted to enter value for each unique variable
- Values are substituted into snippet before execution
- Snippet with substituted values is deployed to devices
User interface:
- Modal dialog shows all variables
- Text input for each variable
- Preview of snippet with values substituted (optional)
- Deploy button enabled after all variables filled
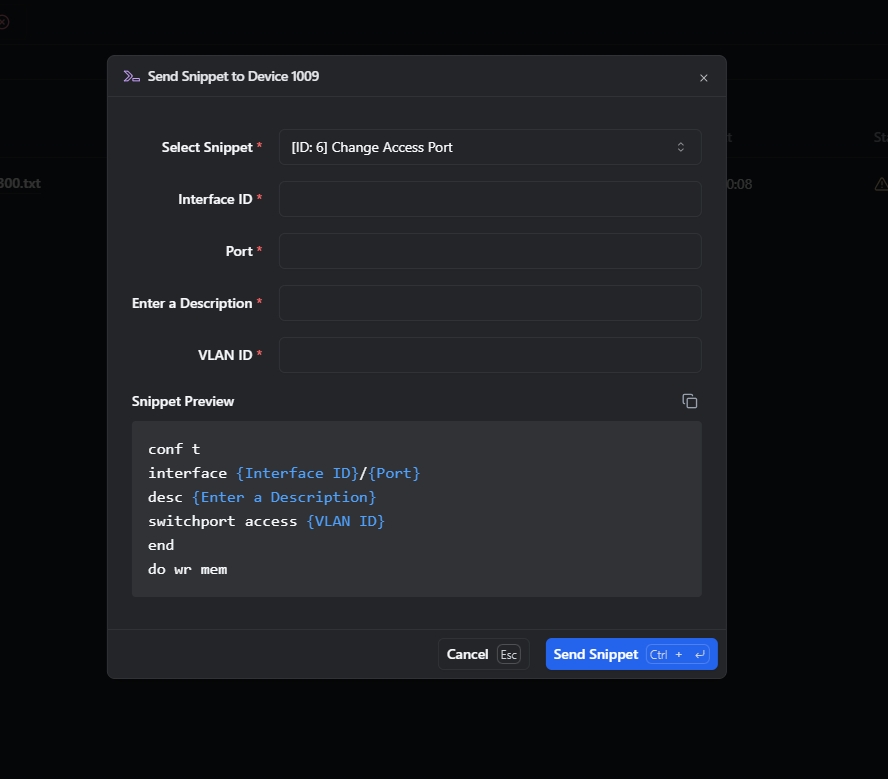
Parameter input dialog prompting for variable values
Common Parameterized Snippet Patterns
Section titled “Common Parameterized Snippet Patterns”VLAN creation:
conf tvlan {vlan_id} name {vlan_name}exitwr memUser account creation:
conf tusername {username} privilege {privilege_level} password {password}exitwr memInterface configuration:
interface {interface_name} description {description} ip address {ip_address} {subnet_mask} no shutdownexitwr memACL with custom network:
conf tip access-list extended {acl_name} permit ip {source_network} {source_wildcard} any deny ip any any logexitwr memAdvanced Snippet Instructions
Section titled “Advanced Snippet Instructions”Snippet instructions modify snippet execution behavior using special directives in the format #[instruction_name instruction_value].
Sleep Instruction
Section titled “Sleep Instruction”Purpose: Pause snippet execution for specified seconds.
Use case: Device needs time to process commands (reloading configuration, restarting services, hardware operations).
Syntax: #[sleep seconds]
Example (reboot device and wait):
conf treload in 1#[sleep 90]! Device should be back online nowshow versionExample (multiple sleeps):
conf tinterface GigabitEthernet0/1 shutdown#[sleep 5] no shutdown#[sleep 5]exitwr mem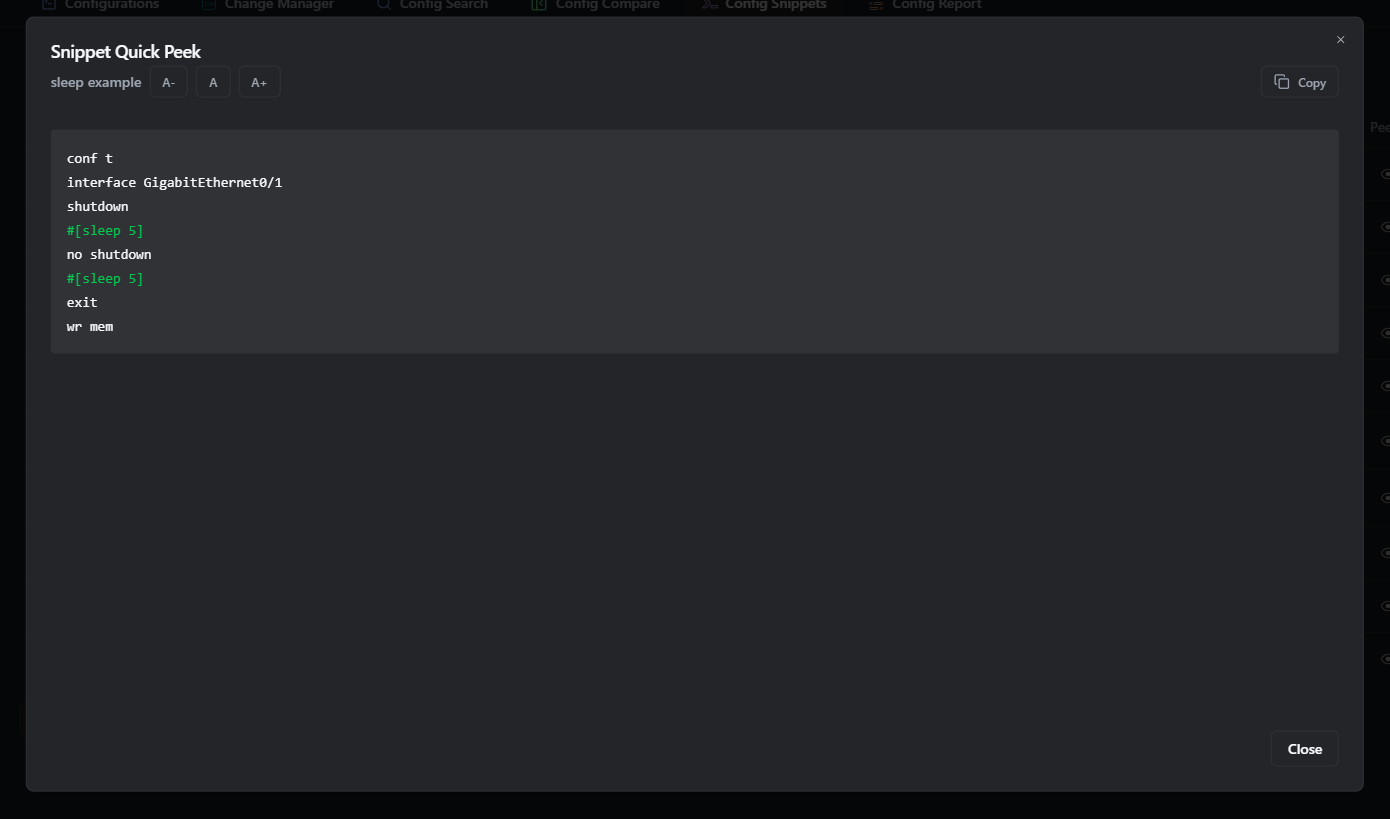
Snippet using sleep instruction to pause execution
Config Prompt Instruction
Section titled “Config Prompt Instruction”Purpose: Override device prompt detection when in configuration mode.
Problem: Some devices change their prompt when entering config mode (e.g., router# becomes router(config)#). If rConfig doesn’t recognize the new prompt, commands fail because rConfig thinks the device isn’t ready.
Solution: Explicitly tell rConfig what prompt to expect in config mode.
Syntax: #[config_prompt new_prompt_pattern]
Example (Cisco config mode):
conf t#[config_prompt router1\(config\)#]vlan 100 name Engineeringexitwr memexitRegex support: Config prompts support regex patterns for flexibility:
#[config_prompt .*\(config\)#]This matches any device name followed by (config)#.
Auto-escaped characters: These characters are automatically escaped in prompt patterns:
(and)(parentheses)'and"(quotes)
Wildcards allowed: Use regex wildcards like .* for flexible matching:
#[config_prompt .*config.*]Matches prompts containing “config” anywhere.
Combining Instructions
Section titled “Combining Instructions”You can use multiple instructions in a single snippet:
conf t#[config_prompt (config)#]interface GigabitEthernet0/1 shutdown#[sleep 5] no shutdown#[sleep 5]exitwr memexitExecution order: Instructions are processed in the order they appear in the snippet.
Deploying Snippets
Section titled “Deploying Snippets”Method 1: Deploy to Individual Device
Section titled “Method 1: Deploy to Individual Device”Use case: Test snippet on single device, or apply a one-off change to a specific device.
Steps:
- Navigate to Devices and open the target device
- Click Send Snippet on the device page
- Select the snippet from the dropdown
- Fill in parameter values (if the snippet uses
{variables}) - Review the Snippet Preview to confirm substituted values look correct
- Click Send Snippet
- Monitor the job in Horizon Queue Manager
Method 2: Scheduled Bulk Deployment via Tasks
Section titled “Method 2: Scheduled Bulk Deployment via Tasks”Use case: Deploy a snippet to multiple devices on a schedule — recurring changes like NTP standardisation, SNMP community updates, or security baseline enforcement.
Steps:
- Navigate to Tasks in the sidebar
- Click New Task
- In the Add Task modal, expand Send Snippets and select a target type:
- Devices — send to one or more individually selected devices
- Command Groups — send to all devices in one or more command groups
- Tag — send to all devices sharing a tag
- Smart Groups — send to devices matched by a smart group filter
- Click Continue with [type]
- Step 1 — Task Info: Enter a Task Name and optional Description, click Next
- Step 2 — Task Configuration: Select the snippet and choose the target devices, groups, or tags, click Next
- Step 3 — Task Schedule: Set the CRON schedule using the dropdowns or choose from the Example CRONs presets, click Next
- Step 4 — Finalize Task: Review the summary (task name, command, targets, schedule, reporting), toggle Task completion email if needed, then click Save
Method 3: CLI Deployment
Section titled “Method 3: CLI Deployment”Use case: Script-based deployment, automation, or debugging.
Command:
php artisan rconfig:send-snippet {snippet_id} {device_id} -dExample:
# Deploy snippet ID 5 to device ID 1001php artisan rconfig:send-snippet 5 1001 -d
# Deploy snippet ID 5 to multiple devicesphp artisan rconfig:send-snippet 5 1001 1002 1003 -dNote: CLI deployment bypasses queue and runs synchronously—useful for debugging but not recommended for large-scale deployments.
Learn more about CLI commands →
Method 4: API Deployment
Section titled “Method 4: API Deployment”Use case: External system integration, programmatic deployment, webhook-triggered changes.
Parameters:
snippet_id: Snippet to deploydevice_ids: Array of device IDsparameters: Object with variable values (if parameterized)
See the in-app API documentation under Settings → REST API Docs for the complete endpoint reference.
Monitoring Snippet Deployment
Section titled “Monitoring Snippet Deployment”Horizon Queue Manager
Section titled “Horizon Queue Manager”All snippet deployments (except CLI debug mode) queue through Horizon.
Access: Navigate to Queue → Horizon Dashboard
Monitor:
- Pending jobs: Snippets queued, waiting for workers
- Processing jobs: Snippets currently deploying
- Completed jobs: Successful deployments
- Failed jobs: Deployment errors requiring attention
Click any job to view:
- Device name
- Snippet name
- Start time
- Duration
- Output captured from device
- Error messages (if failed)
Activity Logs
Section titled “Activity Logs”Detailed snippet deployment history and output.
Access: Navigate to Settings → Logs → Application Log
Filter by:
- Device name
- Snippet name
- Date range
- Success/failure status
Log contents:
- Full device output
- Commands sent
- Prompt detection
- Timing information
- Error details
Troubleshooting Snippets
Section titled “Troubleshooting Snippets”Using Debug Mode
Section titled “Using Debug Mode”If snippet deployment fails, use the -d flag for verbose output:
php artisan rconfig:send-snippet {snippet_id} {device_id} -dNote: All CLI execution runs synchronously and bypasses the queue — this applies with or without -d. The flag only adds verbose debug output.
What -d adds:
- Timestamped internal processing steps (parsing, prompt handling, sleep handling)
- phpseclib SSH protocol-level log dumped after connection
- Error details if connection or prompt matching fails
The output is intentionally low-level. Expect entries like [timestamp] Starting writeSSHSnippet, [timestamp] Processing command block: conf t..., and raw SSH protocol frames — not a clean command-by-command transcript.
Example output (abbreviated):
Start rconfig:send-snippet Snippet ID: 5 Device IDs: 1001[2025-10-12 14:32:15] Starting writeSSHSnippet[2025-10-12 14:32:15] Processing command block: conf t...[2025-10-12 14:32:15] Reading to prompt...[2025-10-12 14:32:16] Config prompt updated to: .*\(config\)#...Send snippet for router1 with snippet: "Add VLAN" completed successfullyEnd rconfig:send-snippetCommon Issues and Solutions
Section titled “Common Issues and Solutions”Snippet Fails with Timeout
Section titled “Snippet Fails with Timeout”Symptom: Snippet job shows “Timeout” error in Horizon.
Causes:
- Sleep instruction longer than connection timeout
- Device slow to respond
- Commands require user confirmation (not provided)
Solutions:
- Increase device connection timeout in device settings
- Reduce sleep duration in snippet
- Add expected prompts/confirmations to snippet
Snippet Partially Executes
Section titled “Snippet Partially Executes”Symptom: Some commands execute, others don’t. Device in inconsistent state.
Causes:
- Prompt detection fails mid-snippet
- Syntax error in later commands
- Device rejects command (ACL error, insufficient privileges)
Solutions:
- Use
#[config_prompt]instruction to fix prompt detection - Test snippet on lab device first
- Review device output in activity logs for error messages
Parameterized Snippet Fails
Section titled “Parameterized Snippet Fails”Symptom: Snippet with variables doesn’t execute.
Causes:
- Variable not filled in (empty value)
- Variable contains special characters breaking command syntax
- Variable substitution failed
- Must ONLY be run from Device Page in the UI
Solutions:
- Verify all variables have values
- Escape special characters in variable values
- Test with simple values first
Commands Execute But Configuration Not Saved
Section titled “Commands Execute But Configuration Not Saved”Symptom: Snippet completes successfully but changes disappear after reload.
Cause: Snippet doesn’t include save command.
Solution: Always end snippets with:
- Cisco:
wr memorcopy run start - Juniper:
commit - Aruba:
write memory
Snippet Works in Lab, Fails in Production
Section titled “Snippet Works in Lab, Fails in Production”Symptom: Same snippet succeeds on test device, fails on production devices.
Causes:
- Software version differences
- Different device prompts
- Different privilege levels
- Different connection templates
Solutions:
- Verify software versions match
- Use
#[config_prompt]for flexible prompt matching - Check user privileges on production devices
- Review connection template settings
Best Practices
Section titled “Best Practices”Testing Workflow
Section titled “Testing Workflow”Never deploy untested snippets to production.
- Lab testing: Test on lab device first
- Single device: Deploy to one non-critical production device
- Small group: Deploy to 5-10 devices
- Review results: Check Horizon logs and activity logs
- Full deployment: Roll out to all target devices
Snippet Organization
Section titled “Snippet Organization”Naming convention:
- Include action: “Add”, “Remove”, “Update”, “Configure”
- Include target: “SNMP”, “VLAN”, “NTP”, “ACL”
- Include scope: “Standard”, “Branch”, “Core”
- Example: “Add Standard SNMP Configuration”
Use tags:
- Vendor:
cisco,juniper,aruba - Function:
security,logging,snmp,ntp - Environment:
production,lab,staging
Create rollback snippets: For every major change snippet, create corresponding rollback snippet.
Example pair:
- Snippet: “Add VLAN 100”
- Rollback: “Remove VLAN 100”
Documentation
Section titled “Documentation”Document each snippet:
- Purpose: What does it do?
- Prerequisites: What must be true before running?
- Impact: What changes on the device?
- Rollback: How to undo if needed?
- Testing: When was it last tested?
Example description:
Purpose: Configures standard corporate SNMP settingsPrerequisites: Device must support SNMPv2cImpact: Sets community string, location, contact, and trap destinationRollback: Use "Remove Standard SNMP" snippetTested: 2025-10-01 on IOS 15.7, workingSecurity
Section titled “Security”Sensitive data:
- Avoid hardcoding passwords in snippets
- Use parameterized variables for credentials
- Consider integration with secret management tools
RBAC enforcement:
- Restrict sensitive snippets to authorized roles
- Audit snippet creation and modification
- Monitor deployment logs for unauthorized usage
Change control:
- Treat snippet deployment as a change
- Document deployments in change management system
- Schedule major deployments for maintenance windows
Performance
Section titled “Performance”Concurrent deployments:
- Default: 10-50 simultaneous deployments (depends on configuration)
- Monitor queue depth in Horizon
- Stagger large deployments if queue backs up
Connection timeouts:
- Set reasonable timeouts (60-120 seconds typical)
- Increase for snippets with sleep instructions
- Decrease for fast, simple snippets
Snippet size:
- Keep snippets focused and concise
- Break large multi-step procedures into multiple snippets
- Long snippets increase timeout risk
Advanced Techniques
Section titled “Advanced Techniques”Conditional Logic (Workaround)
Section titled “Conditional Logic (Workaround)”Snippets don’t support native if/then logic, but you can work around this:
Approach 1: Create multiple snippets for different conditions
- Snippet: “Add VLAN 100 - Cisco”
- Snippet: “Add VLAN 100 - Juniper”
- Deploy appropriate snippet based on device vendor
Approach 2: Use parameterized snippets with different values
- Snippet with
{command_syntax}variable - For Cisco: Enter
switchport mode access - For Juniper: Enter
set interface mode access
Approach 3: Use device-specific command templates
- Configure different command templates per vendor
- Snippet executes using appropriate template
Multi-Vendor Support
Section titled “Multi-Vendor Support”Strategy 1: Separate snippets per vendor
# Snippet: "Add SNMP - Cisco"conf tsnmp-server community rConfig123 ROexitwr mem
# Snippet: "Add SNMP - Juniper"configureset snmp community rConfig123 authorization read-onlycommit
Strategy 2: Parameterized vendor selection
{vendor_command_prefix}{vendor_snmp_syntax} rConfig123 {vendor_access_level}{vendor_commit_command}Variables filled based on vendor.
Error Handling
Section titled “Error Handling”Snippets don’t have native error handling, but you can design defensively:
Remove-then-add pattern:
conf t! Try to remove first (fails silently if doesn't exist)no vlan 100! Now add (works whether vlan existed or not)vlan 100 name Engineeringexitwr memValidation snippet: Create separate snippet to verify changes:
show vlan id 100show running-config | include vlan 100Deploy after main snippet to validate success.
Integration with Backups
Section titled “Integration with Backups”Best practice: Backup before and after snippet deployment.
Manual approach:
- Backup device (manual or API trigger)
- Deploy snippet
- Backup device again
- Use Manual Config Compare to verify changes
Automated approach:
- Create scheduled task that backs up devices
- Create second scheduled task that deploys snippet (runs 5 minutes later)
- Create third scheduled task that backs up again (runs 5 minutes after snippet)
Result: Automatic before/after snapshots for every snippet deployment.
Snippet Library Examples
Section titled “Snippet Library Examples”Example 1: Add Standard NTP Configuration
Section titled “Example 1: Add Standard NTP Configuration”Snippet name: “Add Standard NTP Servers”
Description: Configures primary and secondary NTP servers per corporate policy.
Content:
conf tntp server 10.1.1.50 preferntp server 10.1.1.51exitwr memexitRollback snippet: “Remove Standard NTP Servers”
conf tno ntp server 10.1.1.50no ntp server 10.1.1.51exitwr memexitExample 2: Update Syslog Server (Parameterized)
Section titled “Example 2: Update Syslog Server (Parameterized)”Snippet name: “Update Syslog Server”
Description: Removes old syslog server and adds new one. Use for syslog server migrations.
Content:
conf tno logging host {old_syslog_ip}logging host {new_syslog_ip}exitwr memexitParameters:
{old_syslog_ip}: IP address of old syslog server{new_syslog_ip}: IP address of new syslog server
Example 3: Create VLAN with Extended Configuration
Section titled “Example 3: Create VLAN with Extended Configuration”Snippet name: “Create VLAN - Full Config”
Description: Creates VLAN with name and assigns to interface. Parameterized for flexibility.
Content:
conf tvlan {vlan_id} name {vlan_name}exit
interface {interface_name} switchport mode access switchport access vlan {vlan_id} no shutdownexit
wr memexitParameters:
{vlan_id}: VLAN number (e.g., 100){vlan_name}: VLAN name (e.g., “Engineering”){interface_name}: Interface to assign (e.g., “GigabitEthernet0/10”)
Example 4: Emergency Access-List Deployment
Section titled “Example 4: Emergency Access-List Deployment”Snippet name: “Block Malicious IP - Emergency”
Description: Quickly block specific IP address across all devices. For security incidents.
Content:
conf tip access-list extended BLOCK_MALICIOUS deny ip host {malicious_ip} any log permit ip any anyexit
interface {external_interface} ip access-group BLOCK_MALICIOUS inexit
wr memexitParameters:
{malicious_ip}: IP address to block{external_interface}: Interface facing threat (e.g., “GigabitEthernet0/0”)
Example 5: Device Reload with Sleep
Section titled “Example 5: Device Reload with Sleep”Snippet name: “Reload Device - Scheduled”
Description: Schedules device reload in 1 minute and waits for device to return online.
Content:
#[sleep 5]reload in 1yes#[sleep 90]! Device should be online nowshow versionWarning: Requires connection timeout > 95 seconds. Use with caution.
Example 6: Multi-Step Security Hardening
Section titled “Example 6: Multi-Step Security Hardening”Snippet name: “Apply Security Baseline - Cisco”
Description: Implements multiple security settings per baseline policy.
Content:
conf t! Disable unnecessary servicesno ip http serverno ip http secure-serverno cdp runno lldp run
! Configure login securityservice password-encryptionlogin block-for 120 attempts 3 within 60
! Set timeoutline vty 0 4 exec-timeout 5 0 logging synchronousexit
! Enable logginglogging buffered 16384logging console critical
! Save configexitwr memexit
Troubleshooting Reference
Section titled “Troubleshooting Reference”Quick Diagnostic Checklist
Section titled “Quick Diagnostic Checklist”When snippet fails, check:
Debug Command Output Interpretation
Section titled “Debug Command Output Interpretation”Good output (with -d):
Start rconfig:send-snippet Snippet ID: 5 Device IDs: 1001[2025-10-12 14:32:15] Starting writeSSHSnippet[2025-10-12 14:32:15] Processing command block: conf t...[2025-10-12 14:32:15] Reading to prompt...[2025-10-12 14:32:16] Processing command block: vlan 100...[2025-10-12 14:32:16] Reading to prompt......Send snippet for router1 with snippet: "Add VLAN" completed successfullyEnd rconfig:send-snippetBad output (prompt timeout) — the job errors or returns no output, and the log will show the last command block that was processing before the timeout. The snippet partially executes and leaves the device in an unknown state.
Solution: Add a #[config_prompt] instruction to tell rConfig what prompt to expect in config mode, or increase the device connection timeout.
Bad output (command rejected) — the device output captured in the activity log will contain the device error, for example:
% Invalid input detected at '^' marker.Solution: Fix command syntax or verify the device supports the command on that OS version.
Related Documentation
Section titled “Related Documentation”- Configuration Snippets Concepts - Understanding when and why to use snippets
- Device Connectivity Process - How snippets connect to devices
- Scheduled Tasks - Automating snippet deployment
- CLI Commands - Manual snippet deployment commands
- Horizon Queue Manager - Monitoring deployment jobs
- Roles and Permissions - Controlling snippet access
Quick Reference
Section titled “Quick Reference”Snippet Instruction Syntax
Section titled “Snippet Instruction Syntax”| Instruction | Syntax | Purpose | Example |
|---|---|---|---|
| Sleep | #[sleep seconds] | Pause execution | #[sleep 30] |
| Config Prompt | #[config_prompt pattern] | Override prompt | #[config_prompt (config)#] |
Variable Syntax
Section titled “Variable Syntax”- Format:
{variable_name} - Case-sensitive
- Alphanumeric and underscore only
- Reusable within snippet
- Example:
{vlan_id},{interface_name},{ip_address}
Deployment Methods Summary
Section titled “Deployment Methods Summary”| Method | Use Case | Speed | Scale |
|---|---|---|---|
| Individual Device | Testing, one-off changes | Immediate | 1 device |
| Bulk Selection | Ad-hoc multi-device | Fast | 1-100s devices |
| Scheduled Task | Automated recurring | Scheduled | Any scale |
| CLI | Debugging, scripting | Immediate | Any scale |
| API | External integration | Fast | Any scale |
Common Cisco Save Commands
Section titled “Common Cisco Save Commands”wr mem # Short formwrite memory # Long formcopy run start # AlternativeCommon Exit Commands
Section titled “Common Exit Commands”exit # Exit one levelend # Exit to privileged EXECVendor Config Mode Entry
Section titled “Vendor Config Mode Entry”# Ciscoconf tconfigure terminal
# Juniperconfigureedit
# Arubaconfigure terminal