The {HOST.NAME} macro can now be included in rconfig::prompt and rconfig::enable_prompt. It will automatically replace {HOST.NAME} with the actual Zabbix hostname.
Download by Integration ID API Endpoint:
Added an API endpoint for downloading devices imported via Zabbix integration, using the integration_host_id stored in the devices table. More information can be found in the rConfig REST API documentation (/settings/restapi-docs/download-now).
Inherited Tags on Zabbix Devices:
All inherited tags from Zabbix devices will now be utilized and imported during the extract process. These tags will overwrite any host-specific tags, except for the rconfig::tag tag, which will merge with existing tags.
Dynamic Creation of rconfig::tag Tags:
Tags with the rconfig::tag that have a textual value will now be dynamically created in rConfig and applied to the imported Zabbix host.
Importing Hostgroups as Tags: - Hostgroups can be configured to be imported into rConfig as tags and applied to the imported Zabbix host. This setting is available on the Zabbix Configuration page and is turned off by default.
Zabbix Device Sync is a feature that allows you to sync devices from Zabbix to rConfig. This is useful if you have a large number of devices that you want to import into rConfig. You can sync devices from Zabbix to rConfig. The table below shows the Zabbix version that has been tested with rConfig on the respective rConfig Professional versions.
Upstream Platform
rConfig Version
Upstream Version
Tested
Zabbix
7.0.0
6.4.10
Yes
In this guide we will step through the process of setting up Zabbix Device Sync. We will cover the following:
Take a look at our tutorial video below for a deep review of the process.
How it works
We designed the entire device sync process to be as simple as possible, but there are a few steps to follow. The process follows a well known ETL (Extract, Transform, Load) pattern. After we are connected to Zabbix, we extract the devices in raw format, then we parse the devices and transform and map them to rConfig format. After this we import the devices into an rConfig devices staging table. Finally you can review the devices and import them into the main rConfig devices table. An administrator will design and setup the process after which everything is validated, and then the process is scheduled to run at regular intervals.
We expect the process to be run at regular intervals to keep the devices in sync with Zabbix. The process is designed to be idempotent, so it will not create duplicate devices in rConfig, and the staging tables are cleared after the devices are imported into the main rConfig devices table. Any errors that occur during the process are logged and can be reviewed by the administrator in the rConfig logs.
Before we get started we need to get a few things in place. You will need the following:
rConfig Professional V7.0.0 or later
Zabbix 6.4.10 or later
Administrator level access to Zabbix
Administrator level access to rConfig
Connectivity between Zabbix and rConfig hosts
From a design perspective you will need the following on the Zabbix Side:
A user with read access to the Zabbix API
A host group(s) or tag(s) with the devices you want to sync to rConfig
The hosts to be sync will need to have the following tags:
rconfig::credentialset, rconfig::category, rconfig::tag, rconfig::vendor, rconfig::model, rconfig::template, rconfig::prompt, rconfig::enableprompt
On the rConfig side you will need the following:
A credential set to connect to Zabbix
A category to assign to the devices
A tag(s) to assign to the devices
A vendor to assign to the devices
A model to assign to the devices
A template to assign to the devices
A prompt to assign to the devices
An enable prompt to assign to the devices
Setting up Zabbix
The first step in the process is to configure Zabbix to allow rConfig to connect to it. This is done by creating a user with read access to the Zabbix API. The user will be used by rConfig to connect to Zabbix and extract the devices. The user will need to have read access to the Zabbix API, and the following permissions: host.get, hostgroup.get, user.get, usergroup.get. This can be done from User Management in the Zabbix UI.
Setting up rConfig
The next step is to configure rConfig to connect to Zabbix. This is done by creating a credential set in rConfig. The credential set will be used by rConfig to connect to Zabbix and extract the devices. The credential set will need to have the following details:
Integration Name
Zabbix base URL
Zabbix API User
Zabbix API Password
Host Group(s) or Tag(s) to sync
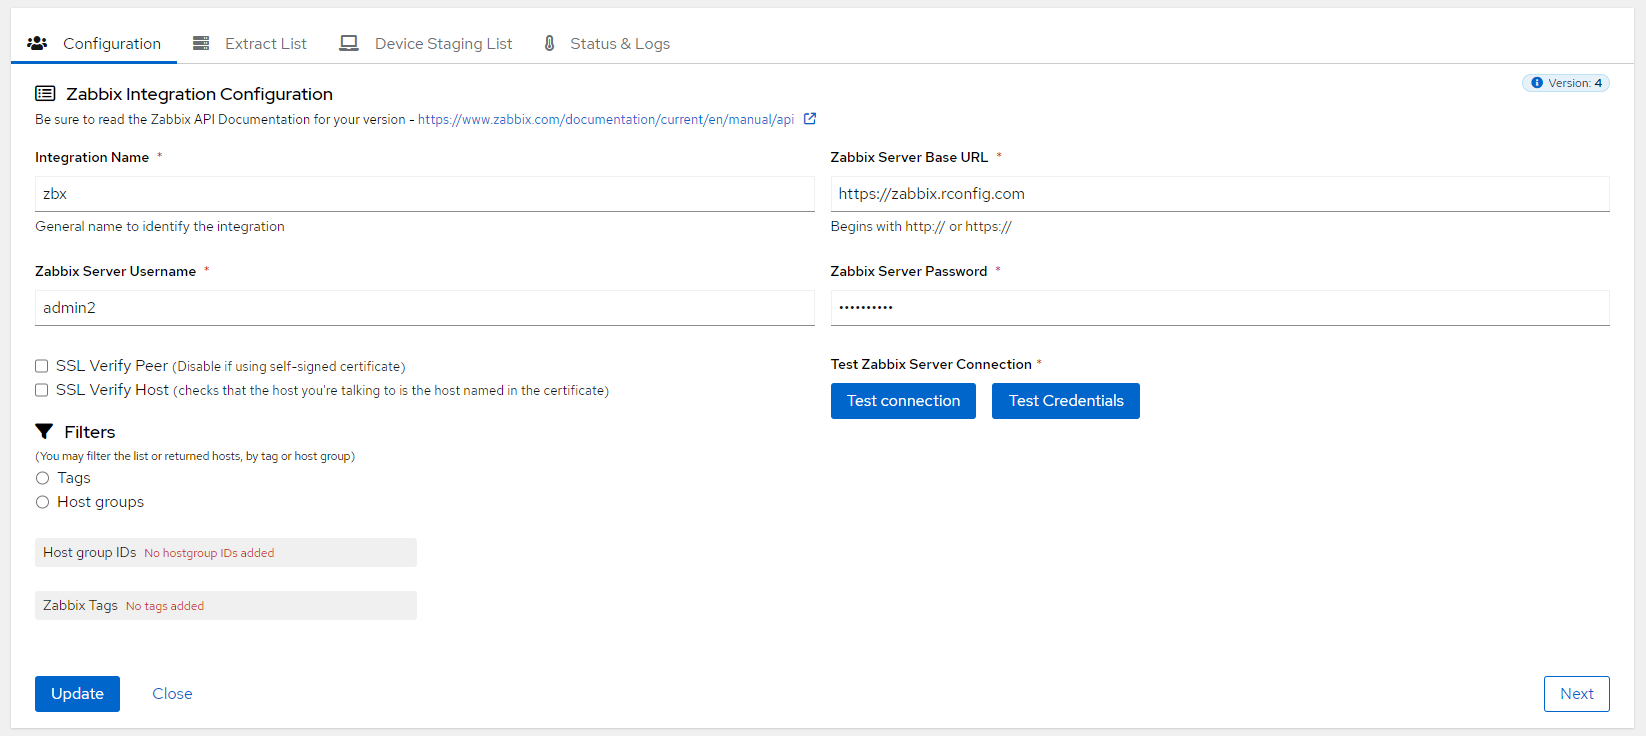
Head over to the Integrations section in rConfig and click configure on the Zabbix integration.
On the form for the Zabbix integration, fill in the details and click Save. Once saved, you can click Test Connection and Test Credentials to verify that rConfig can connect to Zabbix. When tetsing credentials, a successful test will return the first user in the Zabbix system. Not the user you are testing with.
Note: If you have self-signed certificates on your Zabbix server, you will need to disable SSL verification in the Zabbix integration configuration by setting Verify SSL Peer to unchecked, and SSL Verify Host to unchecked.
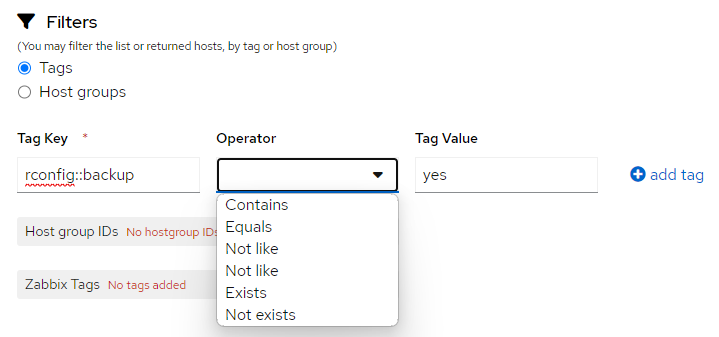
You can select Tags or Host Groups to sync from specific groups of hosts from Zabbix to rConfig. Be sure to click Add tag after making changes. You can add multiple tags or host groups to sync.
Extracting hosts
The first step in the process is to extract the devices from Zabbix. This is done using the Zabbix API. The devices are extracted in raw format and then parsed and transformed into rConfig format. We expect to apply filters per the Zabbix system to only extract the devices that you want to import into rConfig. Once the devices are extracted, they are ready to be imported into rConfig.
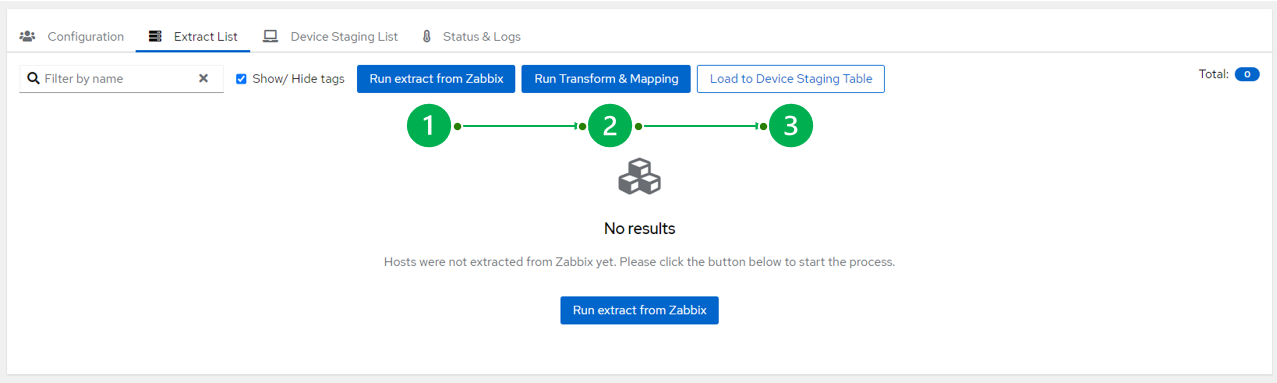
Click Next on the Zabbix integration configuration screen or go directly to the Extract List tab to extract the devices from Zabbix.
In the screenshot below, you can see an empty extract list. We have a three step process to extract, transform and import the devices. The first step is to extract the devices from Zabbix. Click the Run extract from Zabbix button to start the process. This will take a moment to complete.
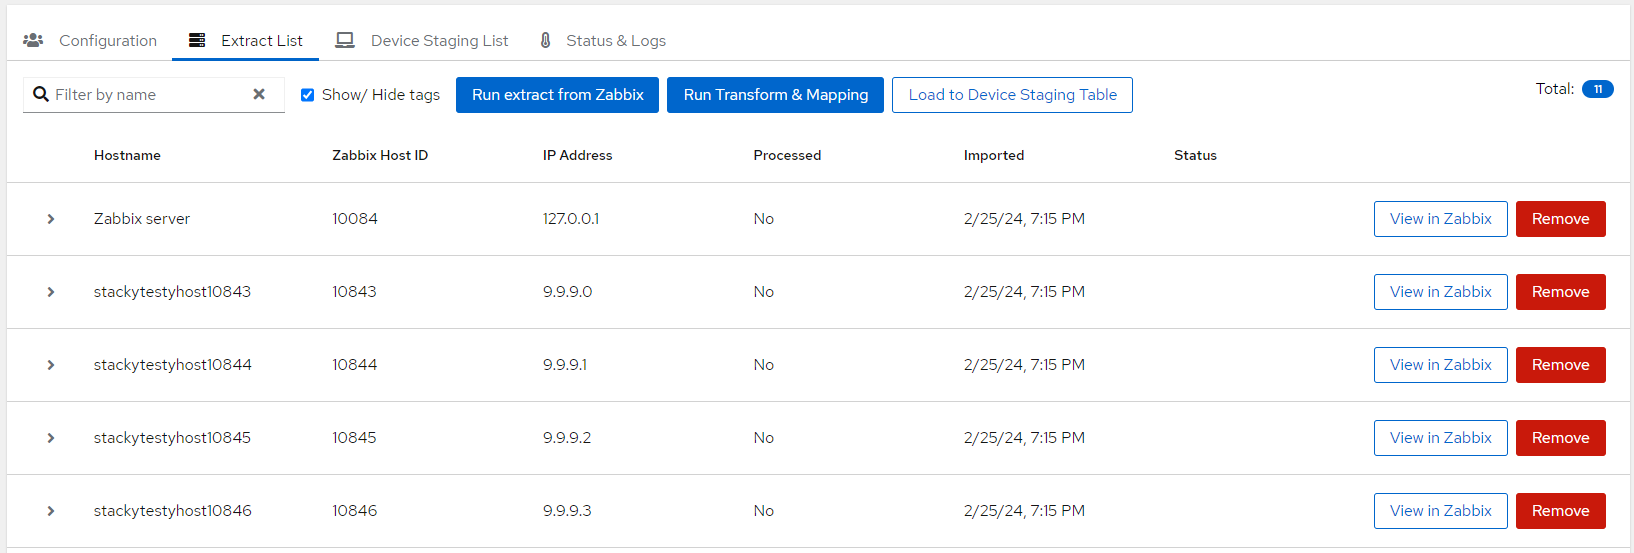
Once the extract is completed, you will see a host list similar to the below. You can see the devices that have been extracted from Zabbix. You can open devices directly in Zabbix by clicking the View in Zabbix button. You can also manually delete devices from the list if you do not want to import them into rConfig. But be careful, as as an automated process will re-import the devices on the next run.
Transforming and Mapping
The next step is to transform and map the devices to rConfig format. This is done using tags that need to be applied on the Zabbix system. The tags are then used to map the devices in rConfig. The tags are listed above and are used to map the correct fields and values for the final list of imported devices in rConfig. All tags are required for a successful import. Click the Run Transform & Mapping button to start the process.
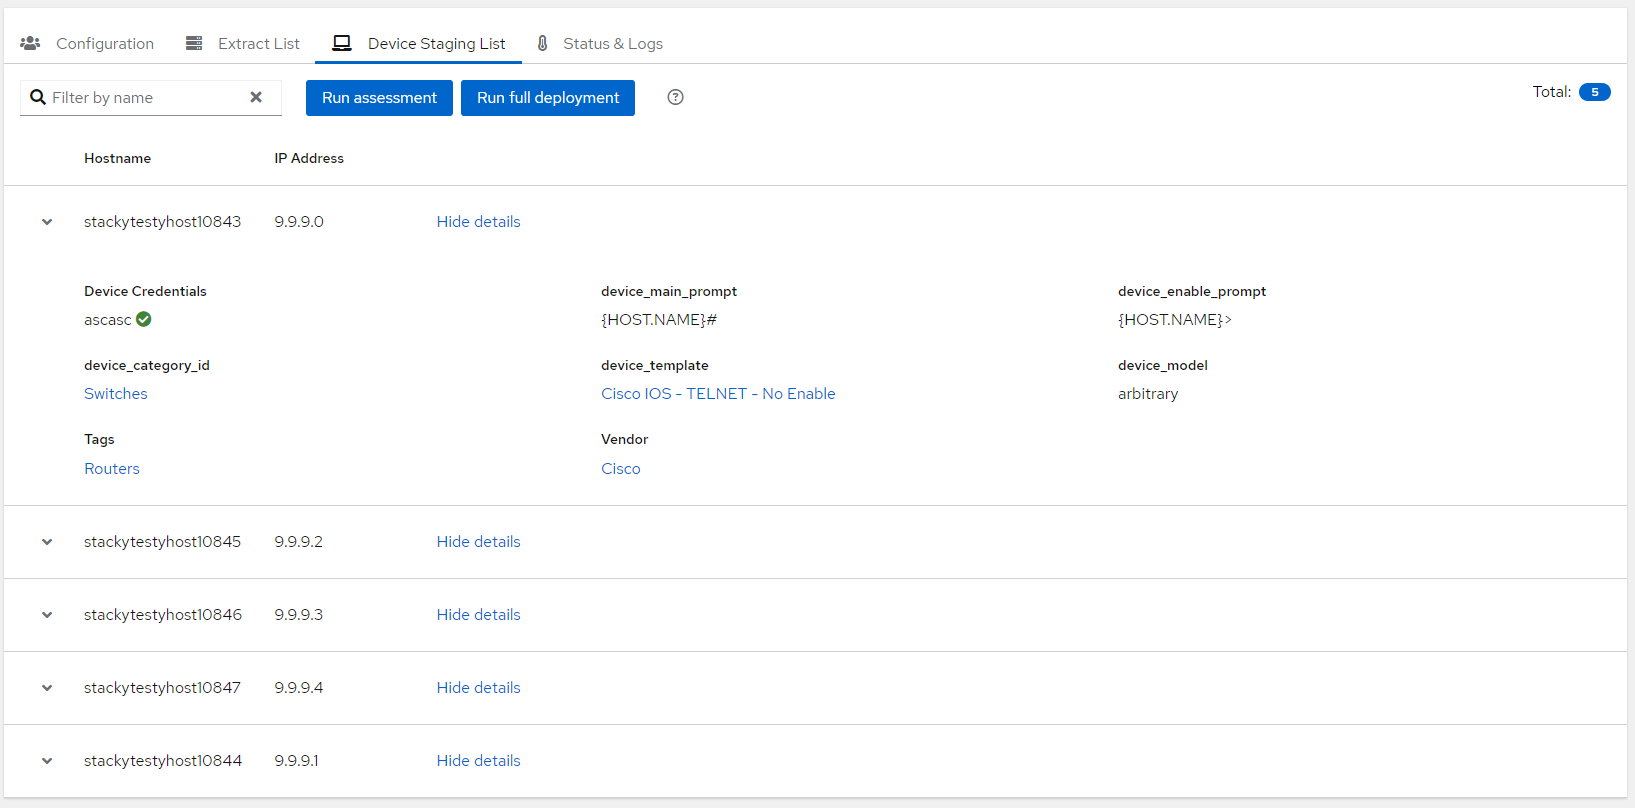
Once this is completed, you will see some changes in the table. You will notice each row can now be expanded to show the tags that have been applied to the devices. You will also see an indication of whether the devices are ready to be imported into rConfig. If there are any errors, you will see a message in the table. You can click the Status & Logs tab to see the details of any errors.
Staging and Importing
If you have an extracted and transformed list you are happy with, go ahead and click the Load to Device Staging Table button to import the devices into rConfig. Wait for a moment for the process to complete. Any invalid hosts, just will not be loaded. All valid hosts will be loaded into the staging table.
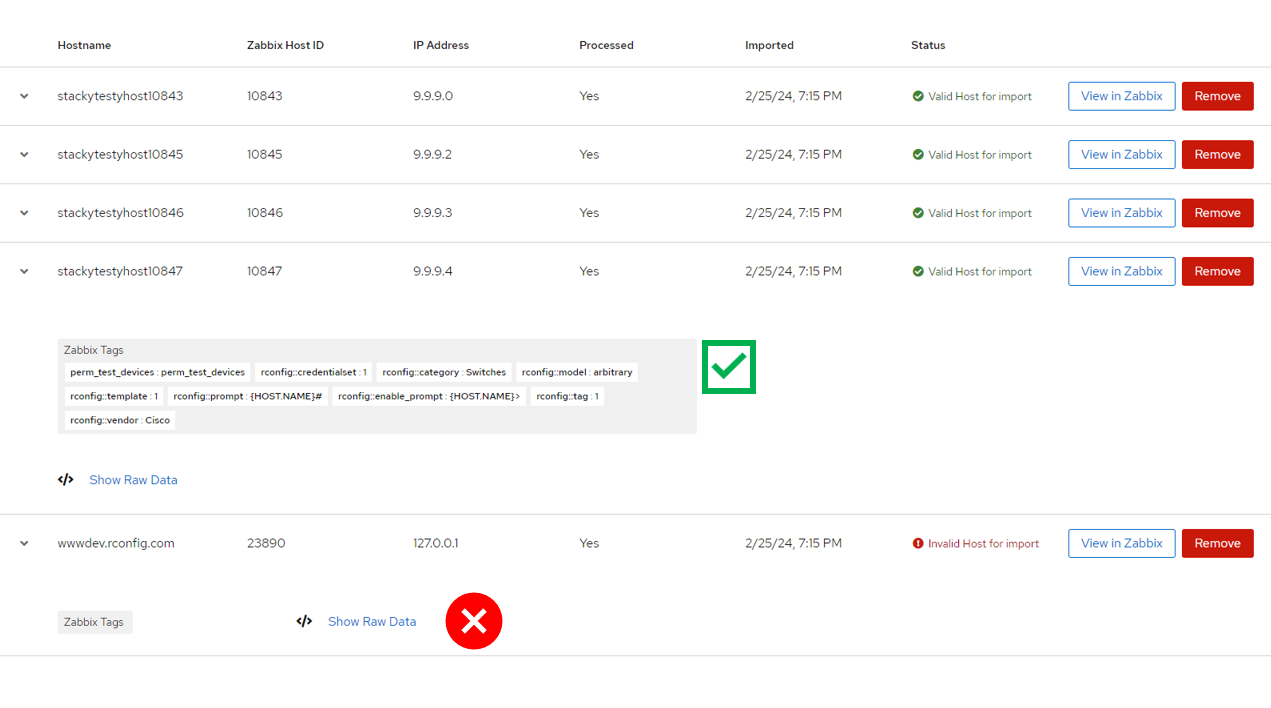
When the staging table is populated, you can review the devices and import them into the main rConfig devices table per the screenshot below. A few things to note on this screen:
You can see the devices that are in the staging table
You can expand each row to see the transformation i.e. you have valid rConfig properties for each device based on the mapped tags
Any devices in this list are ready to be imported
You will also notice two buttons at the top of the table. The Run assessment button will simply run each part of the process in sequence up to the point of loading hosts in to the staging table. This is useful for testing the process before you actually import the devices. The Run full deployment button will run each part of the process in sequence and then import the devices into the main rConfig devices table. This is the final step in the process. When the full deplopyment is complete, the staging table will be cleared.
You should continually monitor the logs for any errors that may occur during the process. You can do this by clicking the Status & Logs tab.
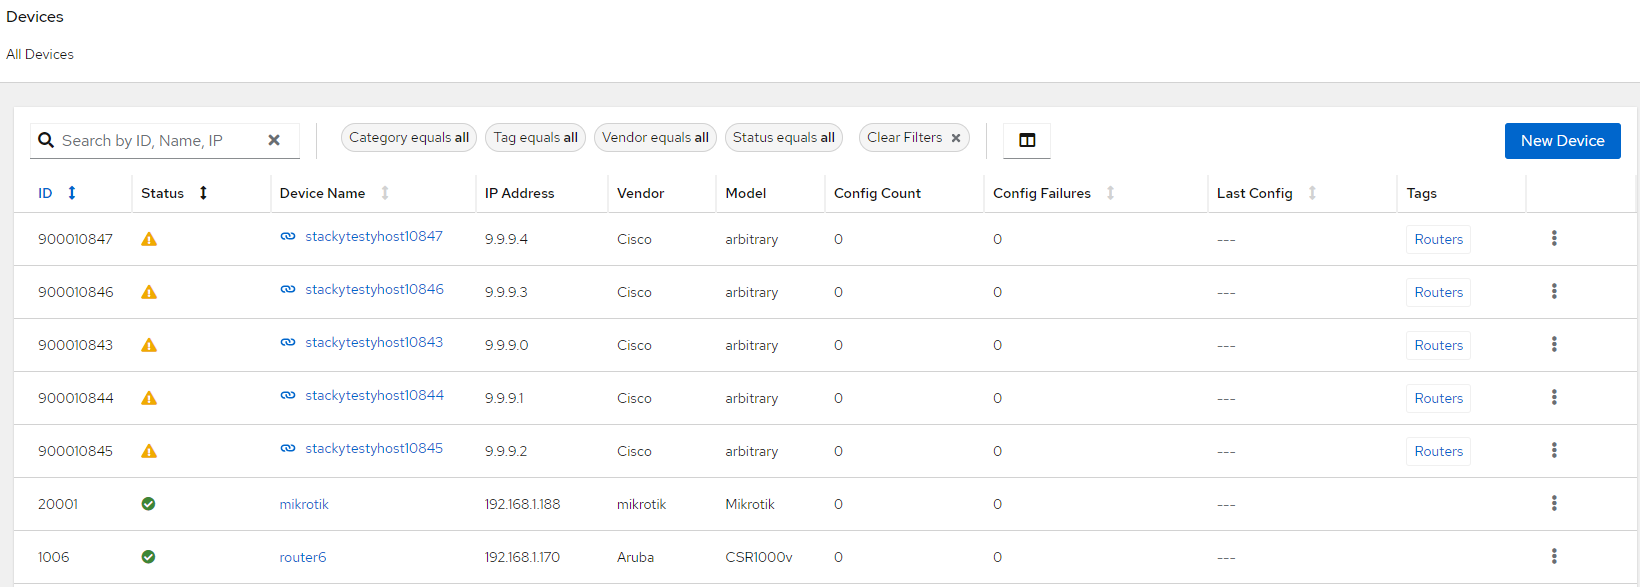
Note the newlly imported devices in the main rConfig devices table. Take note of the indictor icon next to the hostname in the table. This will indicate the source of the device. In this case, the devices have been imported from a device sync integration. The main device view also has this indicator and will have a View in Zabbix button on the main device details menu.
Syncing devices
Once the entire process is complete, you can then use the devices in rConfig as you would with any other device. You can run commands, backup configs, and more. The devices will be kept in sync with Zabbix as the process is designed to be run at regular intervals. The process is designed to be idempotent, so it will not create duplicate devices in rConfig and the staging tables are cleared after the devices are imported into the main rConfig devices table. Any errors that occur during the process are logged and can be reviewed by the administrator in the rConfig logs.
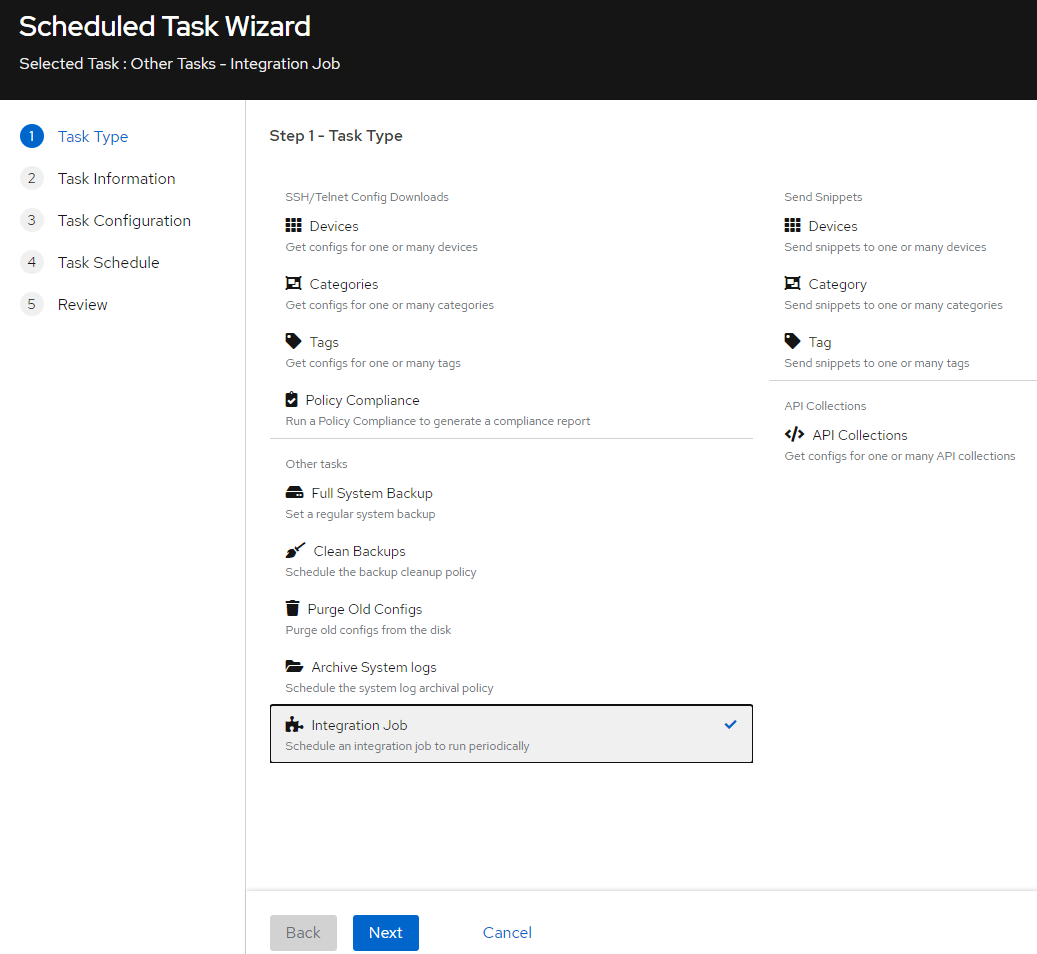
Syncing devices is as simple as create a scheduled task to run the process at regular intervals. You can do this from the Scheduled Tasks section in rConfig. Click Add Task and select Integration Job from the task type dropdown. On Step 2 set the task name and description.
On step 3, you can select the specific Zabbix integration you setup on the Configuration Tab. Step 4 is where you set you schedule. And Step 5 is where you review and save the task.
Commands
As with anything in rConfig, most of the tasks can be run on the CLI for automation, advanced troubleshooting and more. The commands for the Zabbix integration are as follows:
Terminal window
phpartisanrconfig:integration-zabbix
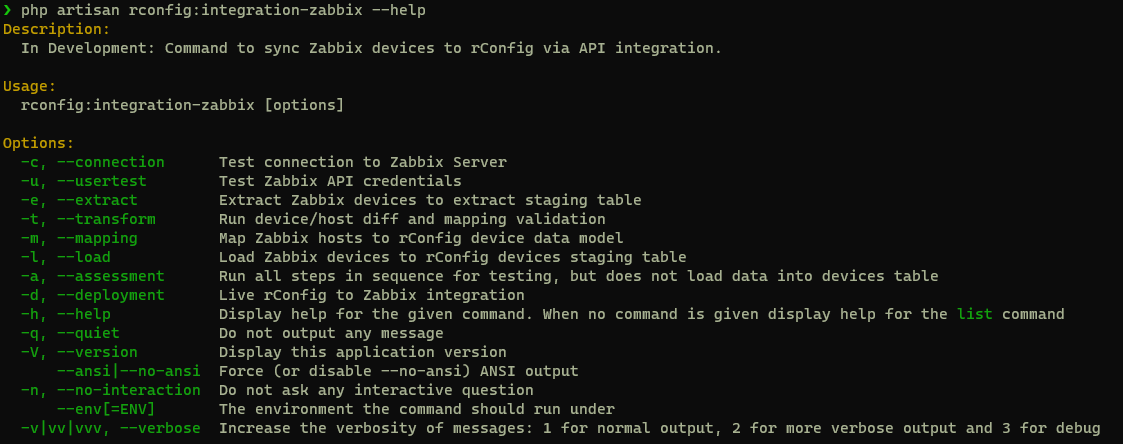
When you run the command without any options, you will see a list of available options. You can run the command with the --help option to see the available options.
Option
Description
shortcut
—connection
Test the connection to Zabbix. Assumed that it has been setup in the UI
-c
—usertest
Test the Zabbix API user credentials. Assumed that it has been setup in the UI
-u
—extract
Extract the devices from Zabbix
-e
—transform
Transform and map the devices to rConfig format
-t
—mapping
Run the mapping process
-m
—load
Load the devices into the staging table
-l
—assessment
Run the assessment process, which runs all previous steps but does not deploy hosts to the main devices table
-a
—deployment
Run the full deployment process, which runs all previous steps and deploys hosts to the main devices table
-d
The various switches are exactly what is run when you click the buttons in the UI. You will get more details in terms of output and errors when you run the command on the CLI.
Conclusion
Zabbix Device Sync is a powerful feature that allows you to sync devices from Zabbix to rConfig. This is useful if you have a large number of devices that you want to import into rConfig. You can sync devices from Zabbix to rConfig. The process is designed to be idempotent, so it will not create duplicate devices in rConfig. and the staging tables are cleared after the devices are imported into the main rConfig devices table. Any errors that occur during the process are logged and can be reviewed by the administrator in the rConfig logs.