rConfig Vector Agent Installation Guide
rConfig Vector Agent Installation: Multi-Platform Network Device Management
Section titled “rConfig Vector Agent Installation: Multi-Platform Network Device Management”The rConfig Vector Agent represents a critical component of the Vector product suite, responsible for command execution, configuration collection, and data transmission to Vector Servers. This guide provides comprehensive installation procedures, prerequisite requirements, and post-installation tasks to ensure successful deployment.
Unlike passive remote proxies that connect and gather data through intermediary channels, the rConfig Vector Agent operates as an active agent deployed directly on devices to continuously monitor, collect, and transmit real-time data securely, ensuring enhanced accuracy, reliability, and comprehensive network insights. Complete the Vector Server installation first so agents can register successfully.
Prerequisites:
- rConfig Vector Server must be installed and operational
- Review Security Hardening Guidelines for agent deployment security
- Understand Vector Architecture and Capabilities before deployment
Agent Capabilities and Limitations
Section titled “Agent Capabilities and Limitations”Capabilities
Section titled “Capabilities”- Real-Time Data Collection: The Vector Agent continuously collects data at scheduled intervals, ensuring current network visibility and insights.
- Secure Communication: Data is encrypted both in transit and at rest, protecting sensitive information from unauthorized access.
- Comprehensive Device Monitoring: Monitor diverse device types including switches, routers, firewalls, and servers. (Note: Version 1.0.0 supports SSH connections exclusively.)
- Scalable Architecture: Deploy Vector Agents across multiple devices, servers, or datacenters to accommodate network growth. Load balancing and redundancy features are planned for late 2025.
- Streamlined Deployment: Deploy efficiently using installation scripts or configuration management platforms including Ansible, Puppet, or Chef.
- Ephemeral Design: The Vector Agent supports flexible lifecycle management—agents can be removed or reinstalled during scheduled maintenance, server migrations, or following unexpected disruptions.
- Cross-Platform Support: Compatible with Linux and Windows operating systems, the Vector Agent operates on physical servers, virtual machines, cloud instances, and containers.
- Enhanced Security Controls: The Vector Agent connects exclusively to designated Vector Servers, eliminating unauthorized access risks. Secure communication protocols including SSH and layered security restrictions ensure complete data encryption.
- Unidirectional Communication Model: The Vector Agent transmits data to the Vector Server exclusively, requiring no inbound connections. This approach minimizes firewall configuration complexity and significantly reduces attack surface.
Current Limitations
Section titled “Current Limitations”- SSH Protocol Exclusive: Version 1.0.0 supports SSH connections exclusively. Future releases will incorporate additional protocols including SNMP and REST APIs.
- Telnet Protocol Unsupported: The Vector Agent does not support Telnet protocol. Telnet represents an obsolete, insecure protocol inappropriate for modern network environments. Configure devices for SSH-based secure communication.
- Operating System Support: The Vector Agent currently supports Linux and Windows operating systems exclusively.
- Manual Update Process: Vector Servers do not automatically update Vector Agents. Manual agent updates are required when new versions release. Automated update functionality is planned for 2025.
- Snippet Support: Version 1.x does not support snippets. Future releases will incorporate snippet functionality enabling complex configuration templates and command sequences.
- SNMP Protocol Support: Version 1.x does not include SNMP support. SNMP functionality will be added in future releases enabling monitoring of SNMP-capable devices.
- API Backup Functionality: Version 1.x does not currently support API-based backup operations. This capability will be incorporated in future releases enabling automated device configuration backups.
Prerequisites
Section titled “Prerequisites”Prior to commencing installation, verify the following requirements:
- Supported Operating Systems:
- Linux: Ubuntu, CentOS, Red Hat (LTS versions recommended)
- Windows Server (2019 or later recommended)
- System Requirements:
- Minimum 2 GB RAM (in addition to OS requirements)
- 10 GB available storage for installation and logging
- Network connectivity to Vector Server (outbound HTTPS/443 or configured port)
- Administrative Access: Root or administrator privileges required for installation.
- License Key: Valid license key required for Vector Agent installation and activation.
- Dependencies: No additional dependencies required for Vector Agent installation.
Installation Procedures
Section titled “Installation Procedures”Vector Agent Binary Download
Section titled “Vector Agent Binary Download”Current Vector Agent binaries for Linux and Windows are available through the rConfig portal. Authenticate to your account and navigate to the Downloads section to access current Vector Agent versions.
rConfig Portal Access
Section titled “rConfig Portal Access”- Navigate to the rConfig Vector Agent download page:
- Authenticate using authorized credentials. Valid licensing is required for download access.
- Following authentication, locate the current Linux binary version (e.g.,
vectoragent-linux-latestorvectoragent-linux-v1.0.2). - Download the binary to your local system, then transfer to the target server.
Vector Agent Install Script (Linux)
Section titled “Vector Agent Install Script (Linux)”If you prefer the automated install script, generate an install command from the Agents screen in rConfig, then run:
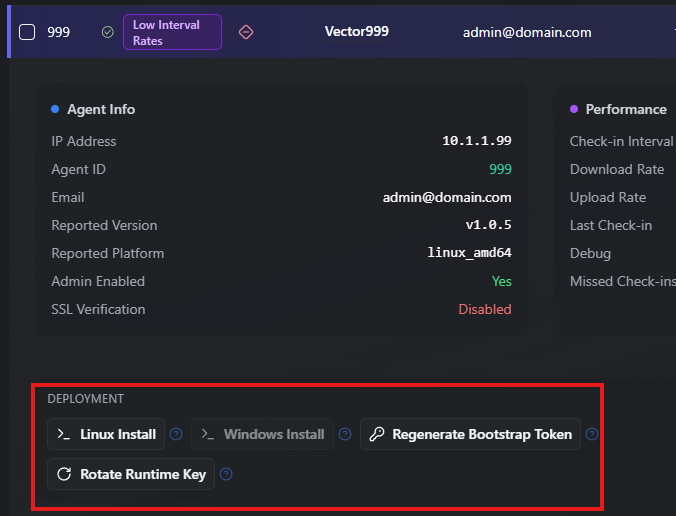
curl -fsSL "https://<server>/vector/install.sh?bootstrap_token=..." | sudo bashThis is a secure process, and the script is signed and verified during execution. The key lasts only 15 minutes for security. And will expire after first use or after 15 minutes.
This script will:
- Download the active latest binary from the Vector Server.
- Bootstrap the agent with the provided token.
- Create the required directories and config files.
Download Process from Vector Server
Section titled “Download Process from Vector Server”The Vector Server hosts the active binary at:
/vector/downloads/vectoragent-latestYou can also request platform-specific downloads:
/vector/downloads/vectoragent-latest?platform=linux_amd64/vector/downloads/vectoragent-latest?platform=windows_amd64Use these endpoints to download the binary directly from the Vector Server (for example, from a browser or automation script).
Manual Addition to the Vector Binary Store (if required)
Section titled “Manual Addition to the Vector Binary Store (if required)”If the Vector Server cannot reach the portal to download the binary, you can manually add the binary files to the server’s storage directory.
- On the Vector Server, locate the binaries directory:
# create the directory if it does not existmkdir -p storage/app/public/agent_binaries
# upload the binary file into this directory:storage/app/public/agent_binaries
# It maybe necessary to reset permissions on the storage directory to allow the web server to read the files afterwardssudo chown -R apache:apache /var/www/html/rconfig8/current/storage# or for ubuntusudo chown -R www-data:www-data /var/www/html/rconfig8/current/storage-
Upload the binary file into this directory.
-
On the Vector Server, mark the binary as active in the Binary Admin page:
/settings/agents/binariesThis allows the Vector Server to serve the binary and generate install scripts.
Vector Agent Installation by Operating System
Section titled “Vector Agent Installation by Operating System”Binary Installation to Target Directory
Following binary download:
- Open a terminal and navigate to the download directory. To relocate to
/usr/local/bin/, or select an alternative directory:
mkdir -p /usr/local/bin/rconfigmkdir -p /usr/local/bin/rconfig/activeagentmkdir -p /usr/local/bin/rconfig/data/logsmkdir -p /usr/local/bin/rconfig/data/dbmkdir -p /usr/local/bin/rconfig/data/filescd /usr/local/bin/rconfig- Move the binary to
/usr/local/bin/rconfigfor system-wide access, and execute verification procedures:
sudo mv vectoragent-linux-latest /usr/local/bin/rconfig# Verify file sizels -lh /usr/local/bin/rconfig# Verify cryptographic hash (md5, sha1, or sha256)# Compare hash with value provided on download pagesha256sum /usr/local/bin/rconfig/vectoragent-linux-latestsha1sum /usr/local/bin/rconfig/vectoragent-linux-latestmd5sum /usr/local/bin/rconfig/vectoragent-linux-latest- Copy the downloaded binary to the
/usr/local/bin/rconfig/activeagentdirectory and rename:
sudo cp /usr/local/bin/rconfig/vectoragent-linux-latest /usr/local/bin/rconfig/activeagent/vectoragent- Configure binary execute permissions:
sudo chmod +x /usr/local/bin/rconfig/activeagent/vectoragentInstallation Verification
To verify binary functionality, execute:
cd /usr/local/bin/rconfig/activeagent./vectoragent --versionVector Agent Version: latestVersion information should display if installation completed successfully.
Systemd Service Configuration
- Create a new systemd service file:
sudo vim /etc/systemd/system/vectoragent.service- Add the following service configuration:
[Unit]Description=Vector Agent ServiceAfter=network.target
[Service]ExecStart=/usr/local/bin/rconfig/activeagent/vectoragentRestart=alwaysUser=rootGroup=rootEnvironmentFile=/usr/local/bin/rconfig/activeagent/.env
[Install]WantedBy=multi-user.target- Save and exit editor
Environment Configuration File
If the binary requires environment variables, define them in:
sudo vim /usr/local/bin/rconfig/activeagent/.envAdd required environment variables:
AGENT_DEBUG=falseAPI_URL=https://server.yourdomain.comAPI_KEY=1234-1234-1234-1234SSL_VERIFY=trueNote: An .env file can be generated from your Vector server following agent creation on the Vector Server. Utilize the generated .env file values to create the agent .env file. The file downloads as a .txt file requiring renaming to .env.

Service Initialization
- Reload systemd to recognize the new service:
sudo systemctl daemon-reload- Enable the service for automatic startup:
sudo systemctl enable vectoragent- Start the service:
sudo systemctl start vectoragent- Verify service status:
sudo systemctl status vectoragentService status should display active (running).
Agent Verification
To confirm agent operational status, review logs:
journalctl -u vectoragent.service -fReview for errors or confirmation messages indicating successful connectivity and operation.
Vector Agent installation and configuration on Rocky Linux is complete.
Binary Installation to Target Directory
- Open a terminal and navigate to the download location. Create required directories:
mkdir -p /usr/local/bin/rconfigmkdir -p /usr/local/bin/rconfig/activeagentmkdir -p /usr/local/bin/rconfig/data/logsmkdir -p /usr/local/bin/rconfig/data/dbmkdir -p /usr/local/bin/rconfig/data/filescd /usr/local/bin/rconfig- Move the binary to the target directory:
sudo mv ~/Downloads/vectoragent-linux-latest /usr/local/bin/rconfig- Copy the binary to the
activeagentdirectory and rename:
sudo cp /usr/local/bin/rconfig/vectoragent-linux-latest /usr/local/bin/rconfig/activeagent/vectoragent- Configure execute permissions:
sudo chmod +x /usr/local/bin/rconfig/activeagent/vectoragent- Verify installation:
cd /usr/local/bin/rconfig/activeagent./vectoragent --versionVersion information should display if installation completed successfully.
Systemd Service Configuration
- Create a new systemd service file:
sudo vim /etc/systemd/system/vectoragent.service- Add the following configuration:
[Unit]Description=Vector Agent ServiceAfter=network.target
[Service]ExecStart=/usr/local/bin/rconfig/activeagent/vectoragentRestart=alwaysUser=rootGroup=rootEnvironmentFile=/usr/local/bin/rconfig/activeagent/.env
[Install]WantedBy=multi-user.target- Save and exit editor.
Environment Configuration File
- Create the environment file if required:
sudo vim /usr/local/bin/rconfig/activeagent/.env- Add necessary environment variables:
AGENT_DEBUG=falseAPI_URL=https://server.yourdomain.comAPI_KEY=1234-1234-1234-1234SSL_VERIFY=trueNote: An .env file can be generated from your Vector server following agent creation on the Vector Server. Utilize the generated .env file values to create the agent .env file. The file downloads as a .txt file requiring renaming to .env.
Service Initialization
- Reload systemd to recognize the new service:
sudo systemctl daemon-reload- Enable the service for automatic startup:
sudo systemctl enable vectoragent- Start the service:
sudo systemctl start vectoragent- Verify service status:
sudo systemctl status vectoragentAgent Verification
Review logs to confirm successful initialization:
journalctl -u vectoragent.service -fThis guide provides procedures for operating the Go binary as a Windows service using NSSM. To streamline updates, the binary will be renamed to vectoragent.exe for deployment, while retaining the original version (vectoragent-windows-latest.exe) as a rollback backup.
Prerequisites
- Go Binary: Verify
vectoragent-windows-latest.exeexists inC:\rconfig. - NSSM Installation: Download and extract NSSM from https://nssm.cc/download.
Binary Preparation
-
Navigate to
C:\rconfig. -
Create data directories:
mkdir datamkdir data\logsmkdir data\dbmkdir data\files- Create backup of the original binary:
copy vectoragent-windows-latest.exe vectoragent-backup-latest.exe- Rename the binary for simplified updates:
rename vectoragent-windows-latest.exe vectoragent.exeService Configuration
- Open Command Prompt with Administrator privileges.
- Navigate to the directory containing
nssm.exe. - Execute the following command to create the service:
nssm install vectoragent- In the configuration window:
- Path: Select the binary file, e.g.,
C:\rconfig\vectoragent.exe. - Startup Directory: Configure to
C:\rconfig. - Options:
- Configure stdout and stderr log file paths if required.
- Path: Select the binary file, e.g.,
Environment Configuration File Creation
- Create a new file in
C:\rconfignamed.env. - Add required environment variables:
AGENT_DEBUG=falseAPI_URL=https://server.yourdomain.comAPI_KEY=1234-1234-1234-1234SSL_VERIFY=trueNote: An .env file can be generated from your Vector server following agent creation on the Vector Server. Utilize the generated .env file values to create the agent .env file. The file downloads as a .txt file requiring renaming to .env.
- Save the file.
Service Initialization
- Execute the service using:
nssm start vectoragent- Verify service status:
nssm status vectoragentRestart Policy Configuration
For automatic service restart on failure:
- Execute:
nssm edit vectoragent- Navigate to the Exit Actions tab and configure:
- Configure Restart delay as required.
Agent Verification and Log Review
- To verify agent operational status, review logs:
nssm log vectoragent- Review for errors or confirmation messages indicating successful connectivity and operation.
Vector Agent Upgrade Procedures
Section titled “Vector Agent Upgrade Procedures”-
Download Current Version Access the rConfig Vector Agent download page and download the current agent version.
-
Stop the operational service:
sudo systemctl stop vectoragent- Replace Existing Binary
sudo cp vectoragent-linux-latest /usr/local/bin/rconfig/activeagent/vectoragentsudo chmod +x /usr/local/bin/rconfig/activeagent/vectoragent- Restart Service
sudo systemctl start vectoragent- Verify Update Completion
/usr/local/bin/rconfig/activeagent/vectoragent --versionUpdated version information should display.
- Download Current Version Access the rConfig Vector Agent download page and download the current agent version.
- Stop the operational service:
sudo systemctl stop vectoragent- Replace Existing Binary
sudo cp ~/Downloads/vectoragent-linux-latest /usr/local/bin/rconfig/activeagent/vectoragentsudo chmod +x /usr/local/bin/rconfig/activeagent/vectoragent- Restart the service:
sudo systemctl start vectoragent- Verify update completion:
/usr/local/bin/rconfig/activeagent/vectoragent --versionVerify correct version information displays.
When upgrading to a new version:
- Stop the service:
Terminal window nssm stop vectoragent - Backup the current binary:
Terminal window copy vectoragent.exe vectoragent-backup-previous.exe - Copy the new version to
C:\rconfigand rename:Terminal window copy vectoragent-windows-v1.1.0.exe vectoragent.exe - Start the service:
Terminal window nssm start vectoragent
Rollback Procedures (if required)
- Stop the service:
Terminal window nssm stop vectoragent - Replace
vectoragent.exewith the previous version:Terminal window copy vectoragent-backup-latest.exe vectoragent.exe - Start the service:
Terminal window nssm start vectoragent
Environment Configuration Update and Service Restart
Section titled “Environment Configuration Update and Service Restart”Environment File Modification
sudo vim /usr/local/bin/rconfig/activeagent/.envImplement required modifications, including API key updates, URL changes, or other configuration variable updates.
Save and Exit
Save the file and exit the editor.
Vector Agent Service Restart
sudo systemctl restart vectoragentService Verification
Verify the service operates correctly following configuration updates.
sudo systemctl status vectoragentStatus should display active (running). If issues occur, review logs using:
journalctl -u vectoragent.service -fWhat’s next
Section titled “What’s next”- Automated Agent Deployment via REST API - Provision agents at scale using the REST API for Ansible, Terraform, and CI pipelines
- Vector Server Installation - Setting up the rConfig Vector Server that agents connect to
- Adding Agents to Vector - Managing agent records and understanding authentication after deployment